How to Download All Photos from Messenger

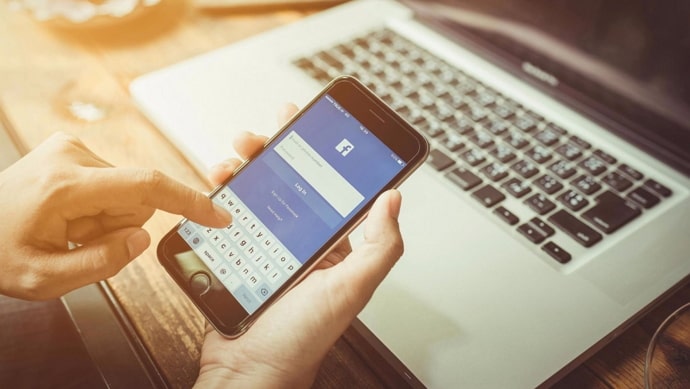
Next to WhatsApp, Messenger is the free chat app that we all enjoy the most. You may send text messages to your friends, make a free video call, and even start a group chat. Perhaps their best feature is how simple it is to use. It is a stand-alone software application from Facebook, and it has been downloaded more than 5 billion times alone from the Google Play Store. Are you one of those people that regularly use the Messenger app? Sending photos and other media is quite common on the app, right?

download all photos from messenger

We occasionally send large files, some of which contain videos. In any case, we appreciate that sending and receiving photographs is easy with the Messenger app.

However, there are often things we are curious about. So, how to download all photos from Messenger? Can we download them all at once, or do we need to do it each of them manually?

These questions cloud our minds, but we are here to clarify them for you. So, hang tight and read the blog until the end if you want to learn more.

Is It Possible to Download All Photos from Messenger?

If you use the Messenger app, there is no doubt you are using it to chat with your friends and family. And, if your friends are getting married, you are sharing pictures left and right.

Well, isn’t it fun sharing pictures and then looking at those a little later? Yes, we all do that, unless some of us use extremely dry texters, which we despise. Anyways, the concern is when you cannot look at the photos in your gallery!

It’s important to note that Messenger does not, by default, save your pictures, but this is not a deal-breaker. We are sure you are wondering if you can do it and how you should do it. Well, this section will answer both of these questions.

Now let’s talk about the question of how to download them. To start, yes, it is definitely possible to download all of the platform’s photos. And surprisingly, doing so is simple.

Well, do you know the auto-save photos feature available for users on Messenger? Once you’ve enabled it, you may use it to save the images and videos in your gallery automatically.

Steps to turn on the auto-save photos feature on Messenger:

Step 1: Go to Messenger app on your phone and enter the sign-in details to log in.

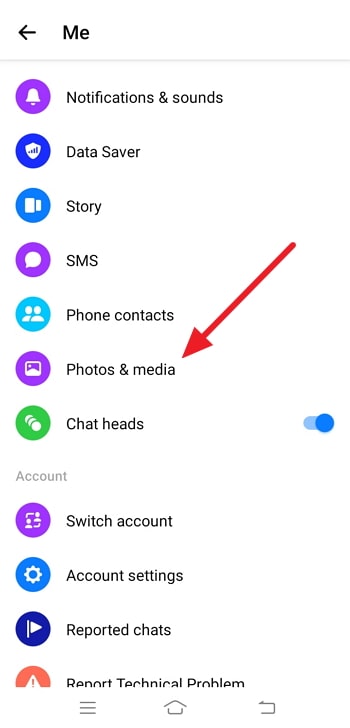
Step 2: Your profile picture is on the top left corner of the home screen. Click on it.

download all photos from messenger

Step 3: There is an option labeled: Photos & Media when you scroll down. Tap it.

download all photos from messenger

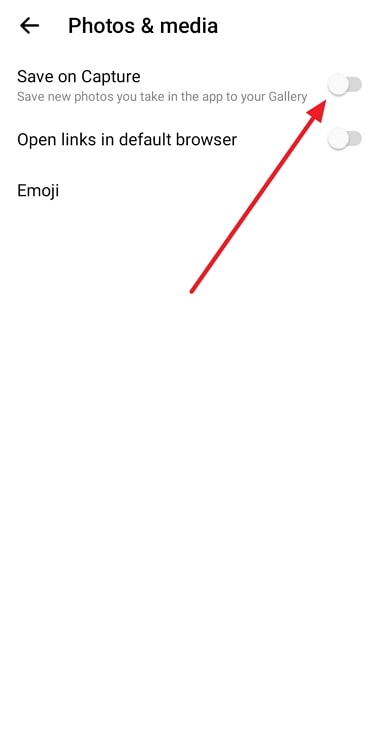
Step 4: Do you see the Save on capture option? You must turn the toggle on for it.

download all photos from messenger

All your photos will be saved automatically on your gallery now.

How to Download All Photos from Messenger

You need to manually turn on the auto-save feature if you wish to download the photos to your gallery. But you must be wondering, what about the older shared photos you need to download?

We occasionally want to look through the earlier pictures we sent and received from our friends. But constantly returning to Messenger and scrolling up to find those images is a little inconvenient.

Besides, the internet connection might sometimes be shaky, or the Messenger server might be down.

So, sit tight and follow the instructions carefully if you wish to download them manually in your gallery.

Steps to download shared photos from Messenger:

Step 1: On Messenger, scroll down to find the chat with the person where the photos are available.

Step 2: Tap the chat once you’ve located it.

Step 3: Long-press the photo to bring up the save option. The image will be saved to your gallery once you tap on it.

download all photos from messenger

Please be mindful that you must repeat the process for each photo if there are several photos.

Save the picture on Messenger using an iPhone:

Step 1: Head to Messenger on your device and hit the Gear icon. You will be whisked to the Settings menu after tapping it.

Step 2: Navigate to the Save image/photos to camera roll button. Once you find it, tap on it.

Step 3: Once the toggle is turned ON, you are done.

Your images will be instantly saved to your iPhone gallery if you follow these instructions.

Downloading data copy via Facebook Messenger: Here’s how that’s done

Not everyone wants to save every picture manually, isn’t it right? Well, if you have the option to download all the photographs at once from Messenger, why would you want to do all that work?

You simply need to download Messnegr’s entire set of data. We are down to assist you if you are unsure of the process.

Step 1: Open Messenger on your phone.

Step 2: You must tap on your Profile picture. It should be present on the upper left side.

download all photos from messenger

Step 3: When you move down, there must be an Account Settings option. Tap on it.

download all photos from messenger

Step 4: You will see Your Facebook information on the screen. Now, tap on Download your information option.

download all photos from messenger

Step 5: You should then hit the Deselect all tab. In the next steps, you must select only the Messages option.

download all photos from messenger

You can modify some options like the Date range of information, the format of the download request, and the quality of photos and other media.

Step 6: Hit the Create file optionand confirm your request.

download all photos from messenger

Step 7: Your downloaded file will appear in the Download Your Information section’s Available Copies option. Download it by entering your password.

download all photos from messenger

Please bear in mind that processing the request can take a few days. Typically, the length of time depends on how much information you have chosen to receive.

In the end

In this blog, we discussed how to download all photos on Messenger. As we observed, the platform offers numerous choices for downloading your photos.

So, we carefully walked you through each step. We hope your phone’s gallery allowed you to store your photos. If you’re looking for more how-to blogs, be sure to visit our website to check them out.

Also Read:

Leave a Reply

Your email address will not be published.