There was a time on Instagram when you could only message someone on Instagram if you followed them. Back then, privacy was a more serious concern than it is today, and the price we paid for it was by limiting our networking boundaries. With time, as more people wanted to connect with new people online for a variety of reasons, they wanted to be given an opportunity to appeal their case. Like on LinkedIn, you’re given a chance to add a personalized note talking about why you want to connect.

Soon, Instagram launched a somewhat similar feature: Message requests. Through message requests, almost anybody on Instagram can text anybody else unless, of course, they’ve been blocked. Does it sound too good to be true? Well, here’s the catch:
Just like you’re free to send a message, the recipient is free to see it, ignore it, or decline it. In fact, they have a separate tab where messages like yours are stored, referred to as the Message requests tab.
When a user receives a message request, they’re given three choices to respond to it: they can delete a message if they’re not interested in replying to it; if they wish to reply, they can accept it; and if they find it creepy, violating, or rude, they can even block the user.
It’s when you choose the first option that the message request gets declined and disappears altogether. Have you ever needed to retrieve one such message request that you declined earlier to show someone or prove a point? If you have, come with us to learn about the solution to your problem.
How to See Declined Message Requests on Instagram
We won’t beat around the bush much; the truth is, once you delete or decline a message request on Instagram, it gets deleted forever. There is no other way to get it back except for one, and we’re going to talk about it next:
Download your information
If you’ve ever needed to recover some deleted data from Instagram in the past, you’d already know this: the Download your information feature on the platform is nothing short of an evergreen garbage can.
It keeps a copy of every data ever shared on the platform, including your message requests. There’s only one downside to it: you can’t get it right away. In fact, you might not even get it in a week.
If your account is older than 3-5 years, it will probably take them 10-14 days to collect and send a report. So, you need to wait patiently.
Another drawback of this method is that you don’t get to choose a narrower category of the data you need. So, you’re going to be looking at a large pile of data from which you’ll need to sort out the stuff you want. It’s not ideal, we know, but it’s the only way to get that message request back.
So, if you’re ready to go through with the process, just follow the step-by-step guide displayed below:
Step 1: Launch Instagram on your smartphone. The first tab that opens up on your screen is the home tab.
Because we need to head to your profile tab, navigate a thumbnail of your profile picture towards the bottom right corner of your screen and give it a tap.

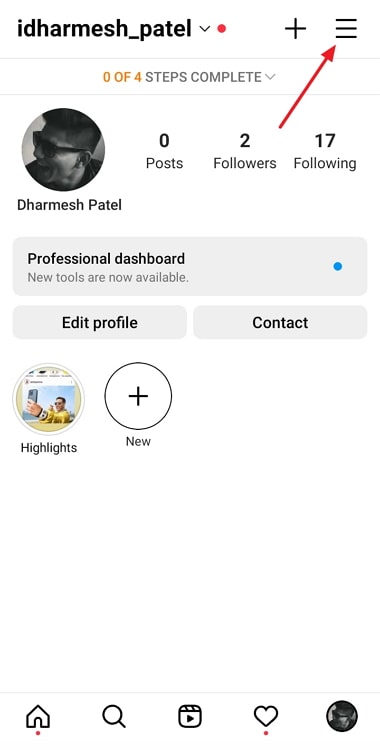
Step 2: Upon landing on your profile tab, look for a hamburger icon on your top-right side, and tap on it to find a menu appearing on your screen.
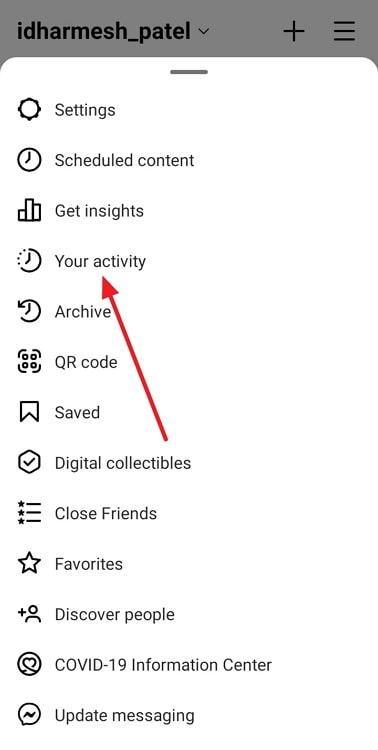
The second option on this menu is of Your activity, with a clock icon next to it, in which the outer circle is partially disappearing; give this option a tap.
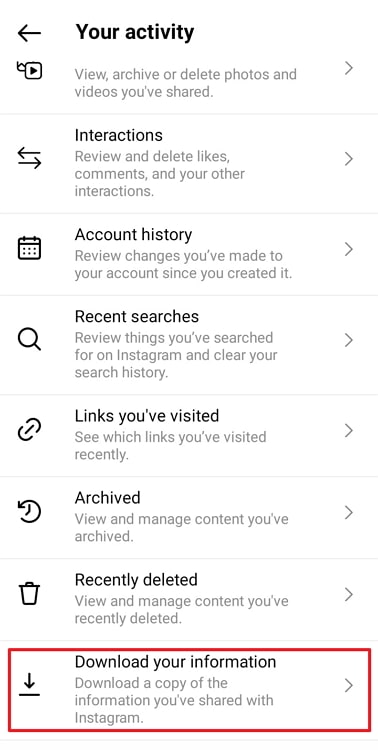
Step 3: Your activity tab is the one place where you can manage all the activities that take place on your account.
You’ll find a list of options here, such as Photos and videos, Account history, and Recent searches.
If you scroll all the way to the bottom of the list, you’ll find the Download your information option with a downward-facing arrow icon drawn next to it. Give it a tap.
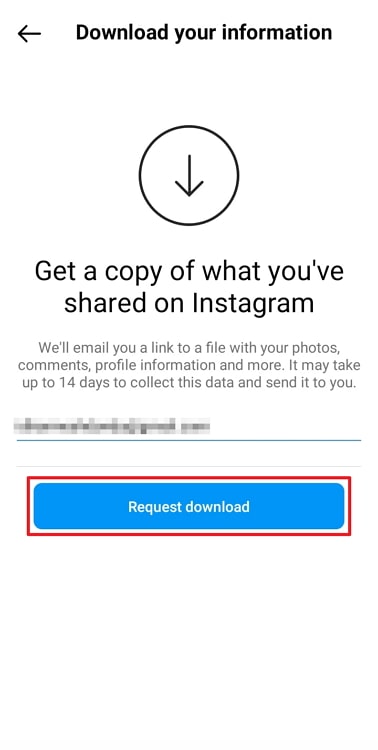
Step 4: Next, you’ll land on the Download your data tab, where you can get a copy of what you’ve shared on Instagram.
This copy will be shared with you via email with a link to a file that you can download.
You need to enter the email address that’s linked to your account in the blank space given on the tab and hit the blue Request Download button at the bottom.
Step 5: Upon doing so, you’ll be taken to another tap where you need to enter your account password. When you’re done, tap the Next option located at the top-right corner.
Step 6: That’s it! You’ll now find yourself on a tab with a tick mark drawn in the middle, followed by this message: Download requested.
Pro-tip: This might come as a surprise to some of you, but you can only request your data once every four days.
Text them yourself, asking about it
If you don’t want to go through all that trouble for just one mere message request, there’s another way of finding that message, but it involves a little confrontation. You can do it yourself by simply texting them. You can tell them you didn’t intend to delete their message, and it happened as a mistake. And because they have little reason to think you’re lying, they’ll probably have no issue resending it.
Wait for them to send another request
The last alternative you have is to wait for them to send another request; if they’ve sent one and didn’t get a response, it’s likely for them to try again. This solution is tailored to those who aren’t in a rush for the answer.
To sum it up
Now that we’ve come to the end of our blog, let’s wrap things up by gathering the takeaways. We began by talking about the introduction of message requests on Instagram and then discussed how declined or deleted message requests were retracted. We’ve suggested several methods above and hope one of them works for you.
Is there any other Instagram issue that you’re struggling with? Allow us to help us by sharing it in the comments below, and we’ll do our best to resolve it.
Also Read: